Installing CyanogenMod 10.1 on an HTC One V (CDMA) phone

My weekend project was installing CyanogenMod 10.1 on an HTC One V phone that I got from my housemate. The phone is made for Virgin Mobile, which uses a CDMA network. The codename I’ve seen for the phone is primoc, though I don’t quite understand how the naming convention works.  The process took me about a day and a half, though it would have only been a couple of hours if I would have realized I needed to activate the phone before I installed the custom ROM and if my backup would have worked correctly.

I’m not quite sure how to write up my experience, but I wanted to share a few warnings or things that would have saved me time and weren’t included in many of the guides.

The ROM zipfiles are hundreds of MBs

Take this into account when planning the time that you need.

Think of the process as multiple steps

A lot of guides combine these into one guide, or gloss over components. I found it helpful to research and understand each task, and also for time-boxing the process.

  1. Unlock bootloader
  2. Install custom recovery image. In this case, this was ClockworkMod Recovery (CWM)
  3. Copy the CyanogenMod and Google Apps distributions (zip files) to the SD card
  4. Install CyanogenMod and Google Apps from the zip files using CWM
  5. Flash the CyanogenMod boot image using fastboot

You don’t have to install any special drivers when using Ubuntu

To run the platform tools on Ubuntu, you need to run then using sudo, e.g.:

sudo ./fastboot flash boot boot.img

Activate the phone first!

The biggest time suck of the process is that I forgot to activate the phone before flashing CyanogenMod. The backup I made didn’t work.  In order to activate the phone (or switch it to your number), you need to use Virgin’s Activate app and this is only available on the stock ROM.  Save some pain and activate the phone using the default ROM before messing around with flashing custom ROMs. Luckily, I found this ROM based on the stock ROM which included the activate app.

There isn’t a RUU for newer versions of this phone

RUU stands for ROM Update Utility. It’s a windows executable used to restore the phone to a default install.

Useful resources

I used these as references during my install:

Offline map tiles in QGIS

Participatory Mapping Station

I was invited to run a station at a DiscoTech event sponsored by the Detroit Digital Justice Coalition (DDJC). DiscoTechs are community technology fairs, and are a really great model for sharing tech knowledge within and across communities. The DDJC has released a zine with stories and bootstrap practices so other groups can run their own DiscoTech events. While previous events had been held in somewhat central locations, this DiscoTech was held at a community center in the 48217 neighborhood at the edge of Detroit and home to a strong community of environmental justice activists who are part of the DDJC.

However, the recreation center where the event was located didn’t have Internet access. This posed a bit of a problem for our station, as we wanted to have people both create analog maps of their community using paper and transparency sheets with dry-erase markers, and digital ones. I chose Quantum GIS (QGIS) as the tool to make digital maps, because it could work on my notebook without any Internet connection. I’ve used the excellent OpenLayers QGIS Plugin to provide slippy map tiles from Open Street Map as a layer in QGIS, but this wouldn’t work without an Internet connection. My solution was to essentially run a full mapping stack on my notebook computer. This was surprisingly straightforward, and helped me better understand how the pieces of a modern custom mapping stack work together.

Make your tiles

First, I had to get the raw data from which to generate my tiles. I grabbed an extract of the Detroit Metro Area from the OpenStreetMap Metro Extracts page since we were just making maps of Detroit and selecting a subset of the map data would save a lot of time when rendering the tiles.

There are lots of ways to make map tiles, but TileMill is pretty easy to use, and very powerful. MapBox, the makers of TileMill also provide a template project called OSM Bright, which they describe as “a sensible starting point for quickly making beautiful maps in TileMill based on an OpenStreetMap database.” To get a basic set of tiles for Detroit, I just followed the OSM Bright quickstart tutorial to generate the tiles I needed.

TileMill lets you export your tiles in a number of different formats, but I chose the MBTiles format because I liked the idea of all of my tiles being packaged in a single file. It just seemed more portable in case I wanted to move my project to a separate machine.

Serve your tiles

There are also many different ways to serve your custom tiles. This tutorial provides a good rundown of one method of building a server, using Mapnik to generate the tiles. However, I wanted something really lightweight, and something that would use tiles in the MBTiles format. I found TileStache, which I liked because it was written in Python, had its own built-in webserver, and supported MBTiles. Because it supports a wide variety of datasources, the configuration seemed a bit daunting at first, but was ultimately pretty simple, at least for using an MBTiles tileset.

.

This is what my tilestache.xml looked like:


        http://127.0.0.1:8000/${z}/${x}/${y}.png
    
    
        -20037508.34
        20037508.34
        20037508.34
        -20037508.34
        18
        1
        1
        top
    
    EPSG:900913
    256
    256
    3
    

And this is what my tilestache.cfg (the file that configures the datasource) looked like:

{
  "cache": {"name": "Test"},
  "layers": {
    "detroit": {
      "provider": {
        "name": "mbtiles",
        "tileset": "detroit2.mbtiles"
      }
    }      
  }
}

Add your tiles as a layer in QGIS

Update: I originally hacked the OpenLayers plugin as described below, but Nathan and David Forest pointed out in the comments that there’s a less hacky way.

GDAL > 1.7.0 supports the Tiled Map Service (TMS) format that we’re serving using to serve our tiles in Tilestache.  You can create a VRT file as described in this blog post, How to display OpenStreetMap data tiles with no plugin inside Qgis and add your tiles as a raster layer.

Hack the OpenLayers QGIS Plugin

The last step is to get the QGIS OpenLayers Plugin to use my local tileserver instead of grabbing them from the OSM tile server over the web. There’s definitely more elegant ways of doing this, but I needed to get this to work fast, so I simply edited the osm.html file that is part of the plugin. On my system, this file was located at ~/.qgis/python/plugins/openlayers/html/osm.html. I edited the file so that around line 33 of the file

, I replaced the tile URL string “http://tile.openstreetmap.org/${z}/${x}/${y}.png” with “http://127.0.0.1:8000/${z}/${x}/${y}.png”, the ServerUrl directive from my tilestache.xml.

After editing this file and starting QGIS, I was able to choose “Add OpenStreetMap layer” from the “Plugins > OpenLayers plugin” menu in QGIS to add a base layer of my custom tileset.

Installing numpy into a virtualenv

I ran into some problems installing numpy in a virtualenv on Ubuntu 10.10.  I’m not sure what the root cause of the problem was, but my environment is a little weird in that I have a number of different python versions installed and virtualenvs using different versuons of python.  The setup for numpy wasn’t finding global environment configuration variables from the call to sysconfig.get_config_vars.  I ended up fixing my issues by copying the global Makefile and pyconfig.h into the virtualenv:

$ mkdir -p /home/ghing/.virtualenvs/foodgenius-analytics/local/lib/python2.7/config/
$ cp /usr/lib/python2.7/config/Makefile /home/ghing/.virtualenvs/foodgenius-analytics/local/lib/python2.7/config/
$ mkdir -p /home/ghing/.virtualenvs/foodgenius-analytics/local/include/python2.7/
$ cp /usr/include/python2.7/pyconfig.h /home/ghing/.virtualenvs/foodgenius-analytics/local/include/python2.7/

Global hotkeys for VLC

For reporting, I often need to fill in my notes with a recording I made of an interview.  This means I need global hotkeys so I can start/stop the player while I’m in my word processor or note-taking program (tomboy or zotero).

VLC has native support for global hotkeys, but for whatever reason, I couldn’t get them to work to map ++ to play/pause with Ubuntu 9.10.

My workaround is based on VLC global hotkeys in Ubuntu with Compiz. But, I use VLC’s remote control interface to control the player instead of the HTTP interface as suggested in the howto.

  • Make sure netcat is installed. We’ll use this to send controls to the remote control interface of VLC.
    $ sudo apt-get install netcat
  • Open up the CompizConfig:
    $ ccsm 
  • Click the checkbox next to Commands and then click on Commands
  • In the Commands tab, type echo “pause” | nc localhost 7777 -q 1 in the Command line 0 field (or the first available field if you have other commands). This command tells the play to toggle pausing the playback.
  • In the Commands tab, type echo “rewind” | nc localhost 7777 -q 1 in the Command line 1 field (or the first available field if you have other commands). This causes the player to rewind playback a few seconds.
  • In the Key Bindings tab, click the Disabled button in the row labeled Run command 0 (or whatever command you specified in the previous steps) and set the hotkey to whatever you want (I use ++).
  • Repeat the previous step for the rewind command (I used ++ because ++ was a hotkey used by another program).
  • Close CompizConfig.

Then, if I run VLC with both the normal and remote control  control interfaces, setting up the remote control interface on port 7777 on my local machine, my global hotkey will work:

$ vlc --extraintf rc --rc-host localhost:7777

You might want to create an alias for running vlc with these options by editing ~/.bash_aliases or ~/.bashrc:

...
alias vlctranscribe='vlc --extraintf rc --rc-host localhost:7777'
...

I’m not quite sure how all the remote control commands work.  For instance, I thought the rewind command would play backwards at the maximum rate, but instead it jumps playback back a few seconds.  I thought the fastforward command would do the opposite of rewind, but instead it slows down playback incrementally.  So, for now, I just have play/pause and jump backwards hotkeys, but that’s enough to make transcribing interview recordings much, much easier.

Seasoned Pretzels

From mom.

  • 2 bags pretzels
  • 1t. seasoning salt
  • 1 t. onion powder
  • 1t. ground mustard
  • 1t. paprika
  • 1t. garlic powder
  • 1t. lemon pepper
  • 1t. dill weed
  • 1t. homemade worchestershire sauce (from the garden of vegan)
  • 1/4 – 1t. cayenne pepper
  • 1 C olive oil

Mix all ingredients together pour over pretzels and stir.  Put in oven at 325 degrees for 10 minutes.  Take out.  Stir.  Put back in for 10 more minutes.

Importing relationships into CiviCRM

As part of my work at the Center for Research Libraries, I am investigating different Constituent Resource Management (CRM) systems.  One of the options is CiviCRM, a popular FLOSS CRM.  As CRL is, in large part, a membership organization, I wanted to see if it was possible to represent the basic information that we keep about our member organizations in the CRM.  I found that data entry through the web interface was pretty slow, so I wanted to experiment with CiviCRM’s contact import capabilities.

CiviCRM lets you define multiple, arbitrary relationships between contacts. This is how we can connect individual contacts with their institution (for instance the Librarian Councilor or Purchase Proposal Representative) or organizational sub-units (a particular library branch) with the parent organization.

Here is an example of part of our paper member information form that shows that sort of information that we collect about a member institution:
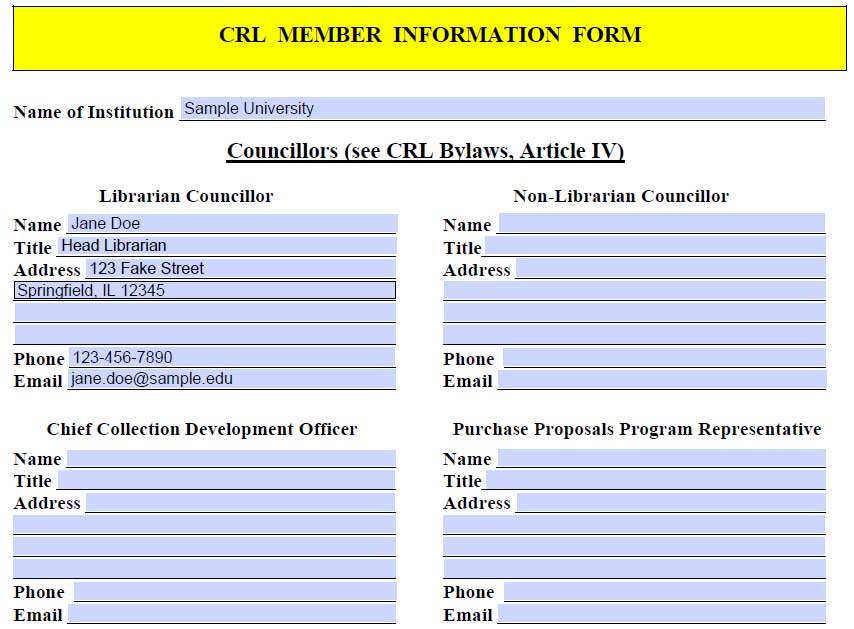
Screenshot of CRL's member information form

CiviCRM also lets you import contact information and relationship information through comma separated value (CSV) files. However, there are a number of things that need to be configured in order to get this working properly.

Need to have contact types configured correctly for the relationship

This is configured at Administer > Options List > Relationship Types

When you create a new relationship, it sets Contact Type A/Contact Type A to any contact type. This works fine if you are defining relationships within CiviCRM’s web interface, but doesn’t work well when importing contacts. This is because CiviCRM will not be able to correctly match the related contact if the contact type is not explicitly set.

In the case of our “Librarian Councillor of” relationship, Contact A is an Individual (the member organization librarian) and Contact B is an Organization (the member organization):
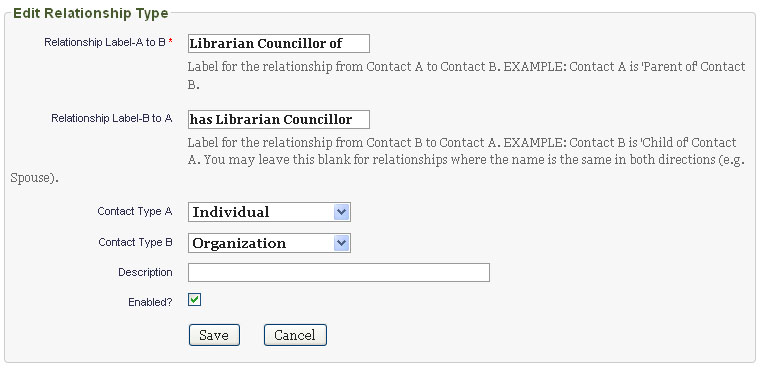
Configuring a relationship in CiviCRM

Need to update strict matching rules for individuals

CiviCRM has configurable matching criteria for identifying and merging existing duplicate contacts and for updated existing contacts based on import data. This feature is documented in the CiviCRM documentation page Find and Merge Duplicate Contacts.

The matching criteria can be configured at Administer > Manage > Find and Merge Duplicate Contacts. By default CiviCRM defines Strict and Fuzzy rules for each contact type. CiviCRM uses the strict rule when importing contact data. However, the default rules might not fit the data that you have. For instance, by default, the strict rule for matching individuals puts all the weight on e-mail address. For many of the contacts, however, there is not an e-mail address. So, I had to update the Strict rule for Individual contacts to also match on First Name, Last Name, and Phone Number. Note that I set the weight so that all three values must match for CiviCRM to consider the contact a duplicate:
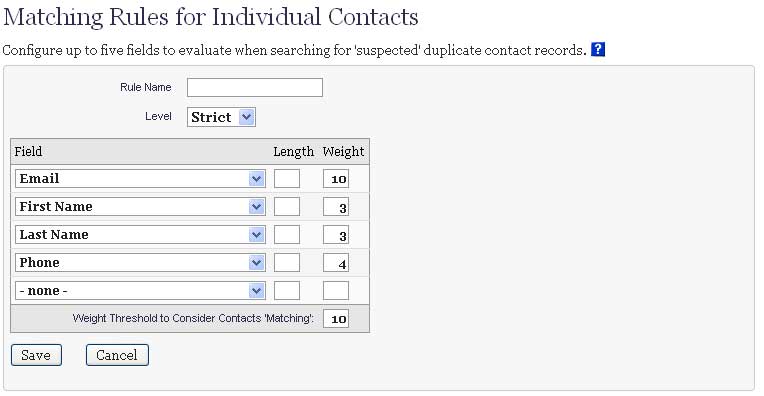
Configuring the duplicate matching rules in CiviCRM

If you don’t configure these rules correctly, you will get duplicate entries when you try to import your contact relationships.

Need to only have one relationship per CSV import file

This is one of the most confusing aspects of the relationship import process. Initially, I tried to put all the relationships in the same CSV file that I used to import the individual contact:

First Name,Middle Name,Last Name,Job Title,Individual Prefix,Individual Suffix,Street Address,Supplemental Address 1,Supplemental Address 2,City,Postal Code Suffix,Postal Code,Address Name,County,State,Country,Phone,Email,Note(s),Employee Of, Librarian Councillor of
Jane,,Doe,Head Librarian,,,123 Fake St.,,,Springfield,,12345,,,Illinois,,123-456-7890,jane.doe@sample.edu,,Sample University, Sample University

That is, in the last 2 columns, I specify that the individual contact (Jane Doe) is an Employee of and the Librarian Councillor of Sample University.

This doesn’t work! I can only specify a single Individual -> Organization relationship in each CSV file. So, I need to break out the Librarian Councillor of relationship into a separate CSV file:

individual_import.csv:

First Name,Middle Name,Last Name,Job Title,Individual Prefix,Individual Suffix,Street Address,Supplemental Address 1,Supplemental Address 2,City,Postal Code Suffix,Postal Code,Address Name,County,State,Country,Phone,Email,Note(s),Employee Of
Jane,,Doe,Head Librarian,,,123 Fake St.,,,Springfield,,12345,,,Illinois,,123-456-7890,jane.doe@sample.edu,,Sample University

librarian_councillor_import.csv:

First Name,Middle Name,Last Name,E-mail,Phone,Librarian Councillor for
Jane,,Doe,jane.doe@sample.edu,,Sample University

I will first import the contact CSV (individual_import.csv), then the relationship CSV (librarian_councillor_import.csv).

Need to include fields in CSV so that matching rules will work

Note that in the above example, I have to be sure to include enough information for our matching rules that I defined before to match Jane Doe to her existing database entry. So, I need to have either an e-mail address or First Name, Last Name, and Phone number.

Need to tell import process how to handle duplicate contacts

When importing the relationships, we will already have imported the individual contact information. So, we just want to update the existing individual contact record to reflect their relationship with their organization. So, we need to set the For Duplicate Contacts option of the import settings to Update.
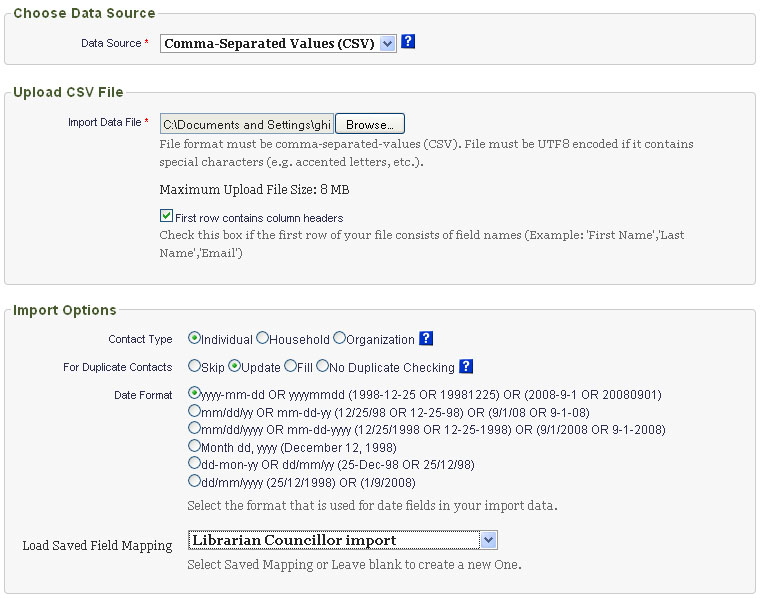
Configuring CiviCRM import settings

Need to set up relationship import field mappings correctly

The field import mapping setting that I needed for the relationship import file (in this example librarian_councillor_import.csv) wasn’t immediately obvious to me. Here is a screenshot of the configuration that worked:
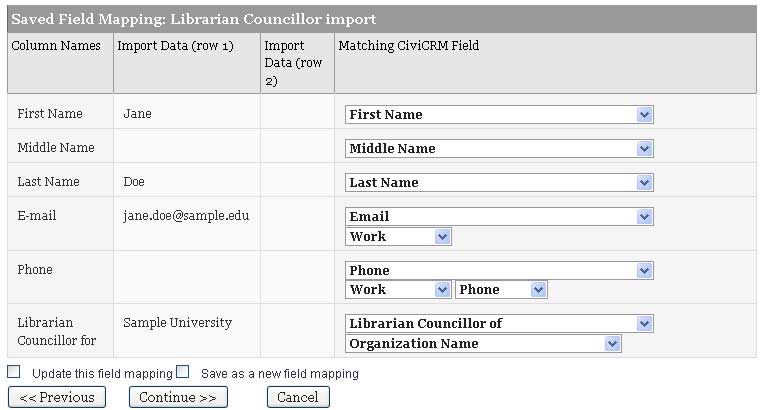
Configuring import field mappings in CiviCRM

Note that the Librarian Councillor for field in the CSV if mapped to the Library Councillor of relationship (that I defined at Administer > Options List > Relationship Types) and that the option of this mapping is set to Organization Name so that it will try to relate the imported contact to the existing organization contact record with the name specified in the CSV file.

Summary

So, it is possible to import both individual and organizational contacts into CiviCRM as well as the relationships between them. However, this could be tedious because each relationship type must be imported in a separate file. One possible solution would be to have a master spreadsheet that is used to input contact and relationship data. Then the spreadsheet programs filters/macros could be used to export appropriate CSV files for importing the contacts and relationships into CiviCRM. The import process is still somewhat complicated, so it seems best to do have systems staff assist with an initial mass import and then have future contacts input manually through the web interface.

Backing up and verifying files in Mac OS

There are some interesting backup tools for system backups (Time Machine) but I want to just be able to copy and verify a directory (and its children).  I’ve heard that the commercial product Retrospect provides copy and verify functionality, but I’m cheap.

This is the method that I used.  I’d be interested on hearing feedback about it:

# Copy the files using ditto 
$ ditto /Volumes/Backup/columbus_da/ /Volumes/ghingexternal/columbus_da

# Get md5s for the original and copied files
$ find /Volumes/ghingexternal/columbus_day/ -exec md5 '{}' \; > md5s-new.txt
$ find /Volumes/Backup/columbus_day/ -exec md5 '{}' \; > md5s-old.txt

# Strip out the directory prefix from the md5 files
$ mv md5s-old.txt md5s-old.txt.bak
$ mv md5s-new.txt md5s-new.txt.bak
$ sed 's/\/Volumes\/ghingexternal\///' md5s-new.txt.bak > md5s-new.txt
$ sed 's/\/Volumes\/Backup\///' md5s-old.txt.bak > md5s-old.txt

# Compare the md5s of the copied files
$ diff md5s-old.txt md5s-new.txt

hfs+ on linux

I got a new MacBook from work and need to migrate files from my old Dell notebook running Xubuntu Linux.  Luckily, I had recovered a drive from a bricked machine that was donated to pages that I could use to transfer the files.

I don’t like the Fat32 file system, so I formatted the external drive as hfs+.  My workstation, running Debian, mounted the drive fine, but I couldn’t write.  I found that I had to disable journaling on the drive before I could write it in Linux:

$ diskutil disableJournal /Volumes/ghingexternal

Note: that command has to be run on the Mac.

Once I did this, I could write to the disk, but only as root.  Permissions of hfsplus partition, a thread on the Ubuntu message boards, provides this insight which is likely the case:

I got a new MacBook from work and need to migrate files from my old Dell notebook running Xubuntu Linux.  Luckily, I had recovered a drive from a bricked machine that was donated to pages that I could use to transfer the files.

I don’t like the Fat32 file system, so I formatted the external drive as hfs+.  My workstation, running Debian, mounted the drive fine, but I couldn’t write.  I found that I had to disable journaling on the drive before I could write it in Linux:

$ diskutil disableJournal /Volumes/ghingexternal

Note: that command has to be run on the Mac.

Once I did this, I could write to the disk, but only as root.  Permissions of hfsplus partition, a thread on the Ubuntu message boards, provides this insight which is likely part of the problem (since the mountpoint of the hfs+ formatted drive has uid:gid 99:99 on my Linux box):

I have to preface my entry with the warning that I am a complete newbie. I was having the same problem with accessing my files on my hfs+ partition. What I discovered is that by default OSX doesn’t allow any access for the gid for files and folders in your User’s folders. I don’t know if this is the wisest thing, but I went into the Finder, did a “Get Info” on all the files/folders I wanted to access in Ubuntu, I then went under permissions and switched the Group ID to something I could use in Ubuntu. I then made sure that the line in the fstab that mounts my hfs+ partition had a “gid=XXX” statement that matched what I set in OSX. I also made sure that the user I was using in Ubuntu was part of the group mentioned above. If this doesn’t make sense, let me know and I will clarify. Also, if you need help with OSX permissions, here is a link to an Apple KB article: http://docs.info.apple.com/article.html?artnum=107039

multiple thunderbird profiles at once

I kept getting logjammed checking my personal e-mail at work, so I made separate profiles in Thunderbird for each.  However, every once in a while, I want to open both at once to monitor incoming e-mail from both my personal and work accounts.  In order to do this, you need to provide the -no-remote switch to Thunderbird.

I updated my launcher like this:

 icedove -no-remote -ProfileManager %u