Upgrading Homebrew-installed Postgres 9.3 to 9.5

I didn’t read the instructions when I let PostgreSQL get upgraded from 9.3 to 9.5 with brew upgrade. This is what I had to do to migrate my data after I had already upgraded:

# Switch back to the previous version of postgres, postgis
brew switch postgres 9.3.5_1
brew switch postgis 2.1.4_1
# Start the server (run this in a separate shell)
postgres -D /usr/local/var/postgres
# Dump all my databases
pg_dumpall > pg_dump
# Stop the server
pg_ctl -D /usr/local/var/postgres stop
# Switch back to the up-to-date version of postgres, postgis
brew switch postgresql 9.5.0
brew switch postgis 2.2.1
# Move the old data directory out of the way
mv /usr/local/var/postgres/ /usr/local/var/postgres9.3
# Initialize the data directory for Postgres 9.5
initdb /usr/local/var/postgres
# Start the server
postgres -D /usr/local/var/postgres
# Import the database dump
psql -d postgres -f pg_dump
# Delete the dump file
rm pg_dump
# Stop the server
pg_ctl -D /usr/local/var/postgres stop
# Start the server with launchctl
launchctl load ~/Library/LaunchAgents/homebrew.mxcl.postgresql.plist

Escaping attribute selectors in LESS

I had a really rough time finding any documentation about how to do this.  To escape attribute selectors in LESS, you have to escape the selector and wrap the escaped string in parenthesis:

(~"[data-wysihtml5-command]") {
  text-decoration: none;
}

Installing numpy into a virtualenv

I ran into some problems installing numpy in a virtualenv on Ubuntu 10.10.  I’m not sure what the root cause of the problem was, but my environment is a little weird in that I have a number of different python versions installed and virtualenvs using different versuons of python.  The setup for numpy wasn’t finding global environment configuration variables from the call to sysconfig.get_config_vars.  I ended up fixing my issues by copying the global Makefile and pyconfig.h into the virtualenv:

$ mkdir -p /home/ghing/.virtualenvs/foodgenius-analytics/local/lib/python2.7/config/
$ cp /usr/lib/python2.7/config/Makefile /home/ghing/.virtualenvs/foodgenius-analytics/local/lib/python2.7/config/
$ mkdir -p /home/ghing/.virtualenvs/foodgenius-analytics/local/include/python2.7/
$ cp /usr/include/python2.7/pyconfig.h /home/ghing/.virtualenvs/foodgenius-analytics/local/include/python2.7/

Installing VMware Server 2.0.2 with Linux Kernel 2.6.31-*-rt Ubuntu Studio 10.04

I’m working on a virtualized environment to run scalable instances of the Public Mapping Project app.

While the project offers an EC2 AMI, my boss wanted to run this on our own hardware, so we’re going to use VMware.  To develop the instance images, I wanted to install VMware Server 2.0.2-203138 on my notebook which is running Ubuntu Studio 10.04 with a 2.6.31-11-rt kernel.

The installer provided by VMware doesn’t work out of the box for Ubuntu Systems.  So, I followed the instructions in the Ubuntu Community VMware Server Documentation which instructs users to use a patching system developed by Radu Cotescu.  While this was easy to use and clearly documented, it didn’t work for me.  This is what happened:

ghing@geoffsnotebook:~/Downloads$ sudo ./raducotescu-vmware-server-linux-2.6.3x-kernel-71f8b66/vmware-server-2.0.x-kernel-2.6.3x-install.sh .You have VMware Server archive: 	VMware-server-2.0.2-203138.i386.tar.gzChecking for needed packages on UbuntuYou do have the linux-headers-2.6.31-11-rt package...You do have the build-essential package...You do have the patch package...Extracting the contents of VMware-server-2.0.2-203138.i386.tar.gzFound .tar file for vsock moduleFound .tar file for vmci moduleFound .tar file for vmmon moduleFound .tar file for vmnet moduleExtracting .tar files in order to apply the patch...Untarring ./vmware-server-distrib/lib/modules/source/vsock.tarUntarring ./vmware-server-distrib/lib/modules/source/vmci.tarUntarring ./vmware-server-distrib/lib/modules/source/vmmon.tarUntarring ./vmware-server-distrib/lib/modules/source/vmnet.tarTesting patch...Creating some simlinks for the newer kernels...ln: creating symbolic link `/usr/src/linux-headers-2.6.31-11-rt/include/linux/autoconf.h': File existsln: creating symbolic link `/usr/src/linux-headers-2.6.31-11-rt/include/linux/utsrelease.h': File existsApplying patch...Preparing new tar file for vsock modulePreparing new tar file for vmci modulePreparing new tar file for vmmon modulePreparing new tar file for vmnet moduleChecking that the compiling will succeed...Trying to compile vmci module to see if it worksPerforming make in ./vmware-server-distrib/lib/modules/source/vmci-onlyUsing 2.6.x kernel build system./home/ghing/Downloads/vmware-server-distrib/lib/modules/source/vmci-only/linux/driver.c: In function ‘LinuxDriver_Open’:/home/ghing/Downloads/vmware-server-distrib/lib/modules/source/vmci-only/linux/driver.c:363: error: implicit declaration of function ‘init_MUTEX’make[2]: *** [/home/ghing/Downloads/vmware-server-distrib/lib/modules/source/vmci-only/linux/driver.o] Error 1make[1]: *** [_module_/home/ghing/Downloads/vmware-server-distrib/lib/modules/source/vmci-only] Error 2make: *** [vmci.ko] Error 2There is a problem compiling the vmci module after it was patched. :(

I began to suspect that my problem could be related to the realtime kernel used by Ubuntu Studio. Googling, I found that other realtime kernel users were having problems installing VMware products.

This thread offers a description of the problem and a patch for another VMware project. Based on this I was able to create my own patch for the VMware server kernel module sources. I then modified Radu’s patch and was able to run his shell script to successfully install VMware server.

Relevant files:

To use, simply download my updated version of Radu’s patch and save it in the directory where you unarchived Radu’s installer scripts.

Importing relationships into CiviCRM

As part of my work at the Center for Research Libraries, I am investigating different Constituent Resource Management (CRM) systems.  One of the options is CiviCRM, a popular FLOSS CRM.  As CRL is, in large part, a membership organization, I wanted to see if it was possible to represent the basic information that we keep about our member organizations in the CRM.  I found that data entry through the web interface was pretty slow, so I wanted to experiment with CiviCRM’s contact import capabilities.

CiviCRM lets you define multiple, arbitrary relationships between contacts. This is how we can connect individual contacts with their institution (for instance the Librarian Councilor or Purchase Proposal Representative) or organizational sub-units (a particular library branch) with the parent organization.

Here is an example of part of our paper member information form that shows that sort of information that we collect about a member institution:
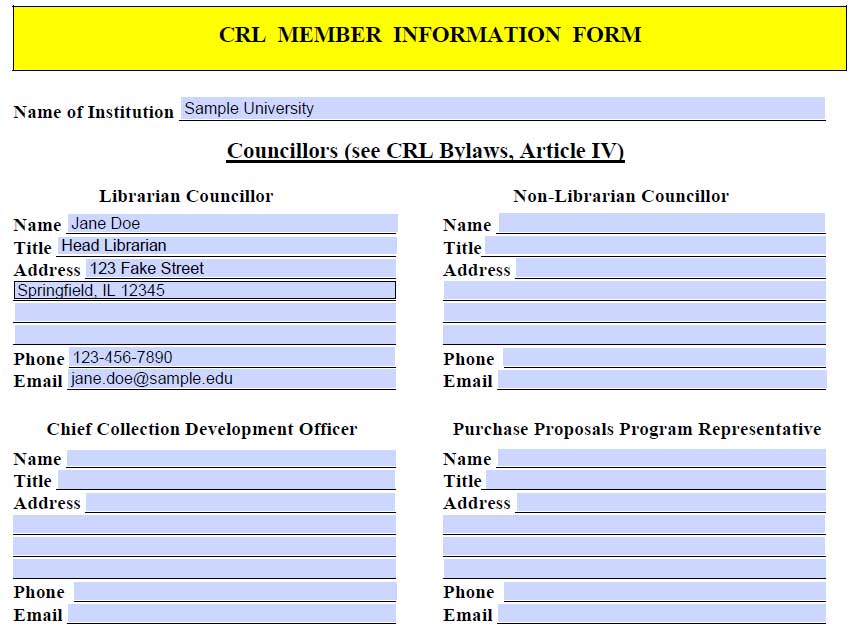
Screenshot of CRL's member information form

CiviCRM also lets you import contact information and relationship information through comma separated value (CSV) files. However, there are a number of things that need to be configured in order to get this working properly.

Need to have contact types configured correctly for the relationship

This is configured at Administer > Options List > Relationship Types

When you create a new relationship, it sets Contact Type A/Contact Type A to any contact type. This works fine if you are defining relationships within CiviCRM’s web interface, but doesn’t work well when importing contacts. This is because CiviCRM will not be able to correctly match the related contact if the contact type is not explicitly set.

In the case of our “Librarian Councillor of” relationship, Contact A is an Individual (the member organization librarian) and Contact B is an Organization (the member organization):
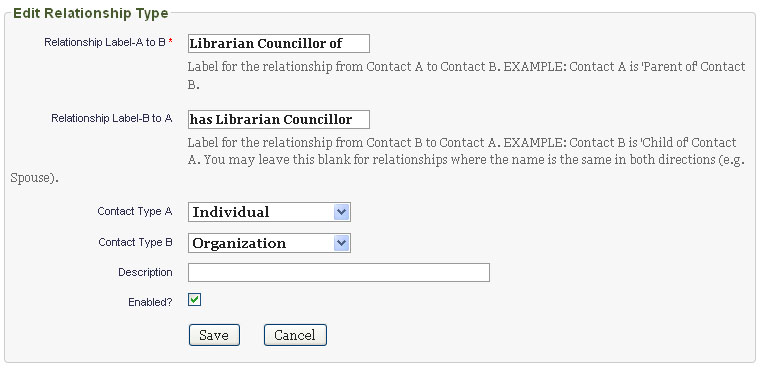
Configuring a relationship in CiviCRM

Need to update strict matching rules for individuals

CiviCRM has configurable matching criteria for identifying and merging existing duplicate contacts and for updated existing contacts based on import data. This feature is documented in the CiviCRM documentation page Find and Merge Duplicate Contacts.

The matching criteria can be configured at Administer > Manage > Find and Merge Duplicate Contacts. By default CiviCRM defines Strict and Fuzzy rules for each contact type. CiviCRM uses the strict rule when importing contact data. However, the default rules might not fit the data that you have. For instance, by default, the strict rule for matching individuals puts all the weight on e-mail address. For many of the contacts, however, there is not an e-mail address. So, I had to update the Strict rule for Individual contacts to also match on First Name, Last Name, and Phone Number. Note that I set the weight so that all three values must match for CiviCRM to consider the contact a duplicate:
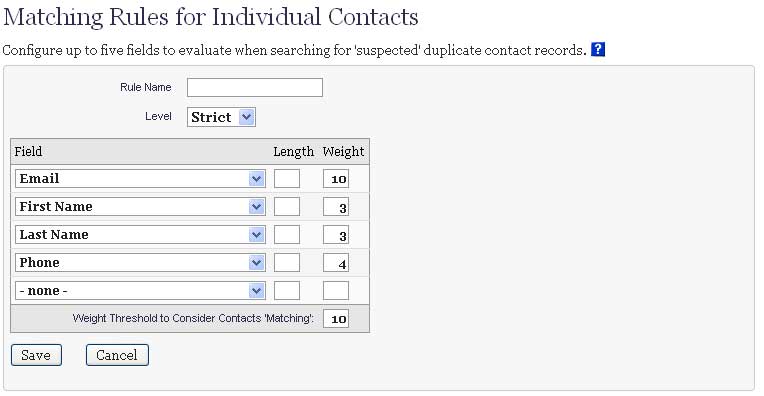
Configuring the duplicate matching rules in CiviCRM

If you don’t configure these rules correctly, you will get duplicate entries when you try to import your contact relationships.

Need to only have one relationship per CSV import file

This is one of the most confusing aspects of the relationship import process. Initially, I tried to put all the relationships in the same CSV file that I used to import the individual contact:

First Name,Middle Name,Last Name,Job Title,Individual Prefix,Individual Suffix,Street Address,Supplemental Address 1,Supplemental Address 2,City,Postal Code Suffix,Postal Code,Address Name,County,State,Country,Phone,Email,Note(s),Employee Of, Librarian Councillor of
Jane,,Doe,Head Librarian,,,123 Fake St.,,,Springfield,,12345,,,Illinois,,123-456-7890,jane.doe@sample.edu,,Sample University, Sample University

That is, in the last 2 columns, I specify that the individual contact (Jane Doe) is an Employee of and the Librarian Councillor of Sample University.

This doesn’t work! I can only specify a single Individual -> Organization relationship in each CSV file. So, I need to break out the Librarian Councillor of relationship into a separate CSV file:

individual_import.csv:

First Name,Middle Name,Last Name,Job Title,Individual Prefix,Individual Suffix,Street Address,Supplemental Address 1,Supplemental Address 2,City,Postal Code Suffix,Postal Code,Address Name,County,State,Country,Phone,Email,Note(s),Employee Of
Jane,,Doe,Head Librarian,,,123 Fake St.,,,Springfield,,12345,,,Illinois,,123-456-7890,jane.doe@sample.edu,,Sample University

librarian_councillor_import.csv:

First Name,Middle Name,Last Name,E-mail,Phone,Librarian Councillor for
Jane,,Doe,jane.doe@sample.edu,,Sample University

I will first import the contact CSV (individual_import.csv), then the relationship CSV (librarian_councillor_import.csv).

Need to include fields in CSV so that matching rules will work

Note that in the above example, I have to be sure to include enough information for our matching rules that I defined before to match Jane Doe to her existing database entry. So, I need to have either an e-mail address or First Name, Last Name, and Phone number.

Need to tell import process how to handle duplicate contacts

When importing the relationships, we will already have imported the individual contact information. So, we just want to update the existing individual contact record to reflect their relationship with their organization. So, we need to set the For Duplicate Contacts option of the import settings to Update.
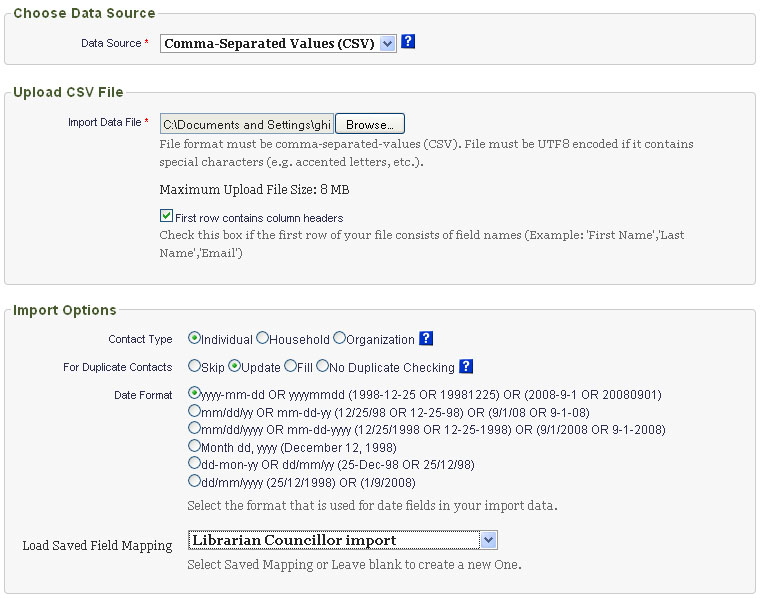
Configuring CiviCRM import settings

Need to set up relationship import field mappings correctly

The field import mapping setting that I needed for the relationship import file (in this example librarian_councillor_import.csv) wasn’t immediately obvious to me. Here is a screenshot of the configuration that worked:
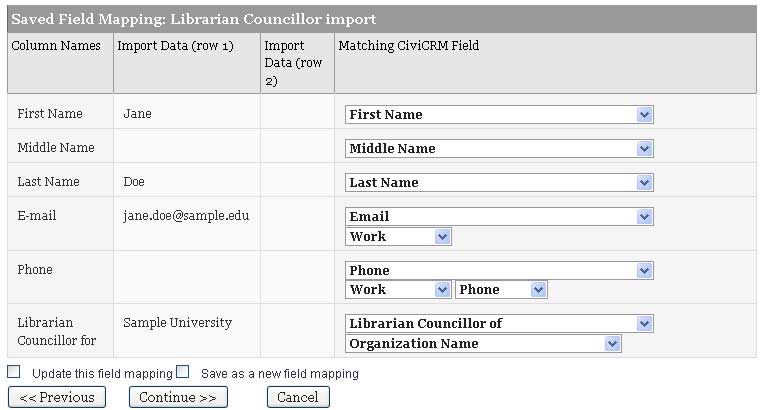
Configuring import field mappings in CiviCRM

Note that the Librarian Councillor for field in the CSV if mapped to the Library Councillor of relationship (that I defined at Administer > Options List > Relationship Types) and that the option of this mapping is set to Organization Name so that it will try to relate the imported contact to the existing organization contact record with the name specified in the CSV file.

Summary

So, it is possible to import both individual and organizational contacts into CiviCRM as well as the relationships between them. However, this could be tedious because each relationship type must be imported in a separate file. One possible solution would be to have a master spreadsheet that is used to input contact and relationship data. Then the spreadsheet programs filters/macros could be used to export appropriate CSV files for importing the contacts and relationships into CiviCRM. The import process is still somewhat complicated, so it seems best to do have systems staff assist with an initial mass import and then have future contacts input manually through the web interface.

Backing up and verifying files in Mac OS

There are some interesting backup tools for system backups (Time Machine) but I want to just be able to copy and verify a directory (and its children).  I’ve heard that the commercial product Retrospect provides copy and verify functionality, but I’m cheap.

This is the method that I used.  I’d be interested on hearing feedback about it:

# Copy the files using ditto 
$ ditto /Volumes/Backup/columbus_da/ /Volumes/ghingexternal/columbus_da

# Get md5s for the original and copied files
$ find /Volumes/ghingexternal/columbus_day/ -exec md5 '{}' \; > md5s-new.txt
$ find /Volumes/Backup/columbus_day/ -exec md5 '{}' \; > md5s-old.txt

# Strip out the directory prefix from the md5 files
$ mv md5s-old.txt md5s-old.txt.bak
$ mv md5s-new.txt md5s-new.txt.bak
$ sed 's/\/Volumes\/ghingexternal\///' md5s-new.txt.bak > md5s-new.txt
$ sed 's/\/Volumes\/Backup\///' md5s-old.txt.bak > md5s-old.txt

# Compare the md5s of the copied files
$ diff md5s-old.txt md5s-new.txt

hfs+ on linux

I got a new MacBook from work and need to migrate files from my old Dell notebook running Xubuntu Linux.  Luckily, I had recovered a drive from a bricked machine that was donated to pages that I could use to transfer the files.

I don’t like the Fat32 file system, so I formatted the external drive as hfs+.  My workstation, running Debian, mounted the drive fine, but I couldn’t write.  I found that I had to disable journaling on the drive before I could write it in Linux:

$ diskutil disableJournal /Volumes/ghingexternal

Note: that command has to be run on the Mac.

Once I did this, I could write to the disk, but only as root.  Permissions of hfsplus partition, a thread on the Ubuntu message boards, provides this insight which is likely the case:

I got a new MacBook from work and need to migrate files from my old Dell notebook running Xubuntu Linux.  Luckily, I had recovered a drive from a bricked machine that was donated to pages that I could use to transfer the files.

I don’t like the Fat32 file system, so I formatted the external drive as hfs+.  My workstation, running Debian, mounted the drive fine, but I couldn’t write.  I found that I had to disable journaling on the drive before I could write it in Linux:

$ diskutil disableJournal /Volumes/ghingexternal

Note: that command has to be run on the Mac.

Once I did this, I could write to the disk, but only as root.  Permissions of hfsplus partition, a thread on the Ubuntu message boards, provides this insight which is likely part of the problem (since the mountpoint of the hfs+ formatted drive has uid:gid 99:99 on my Linux box):

I have to preface my entry with the warning that I am a complete newbie. I was having the same problem with accessing my files on my hfs+ partition. What I discovered is that by default OSX doesn’t allow any access for the gid for files and folders in your User’s folders. I don’t know if this is the wisest thing, but I went into the Finder, did a “Get Info” on all the files/folders I wanted to access in Ubuntu, I then went under permissions and switched the Group ID to something I could use in Ubuntu. I then made sure that the line in the fstab that mounts my hfs+ partition had a “gid=XXX” statement that matched what I set in OSX. I also made sure that the user I was using in Ubuntu was part of the group mentioned above. If this doesn’t make sense, let me know and I will clarify. Also, if you need help with OSX permissions, here is a link to an Apple KB article: http://docs.info.apple.com/article.html?artnum=107039

fixing sound in debian

I’m running debian lenny/sid with  kernel 2.6.26-1 on my workstation and for a while, my audio hasn’t been working in most applications (I was most annoyed by the lack of sound in flash), though it has been working in amarok.  I was getting error messages like this when trying to do audio playback.  These particular messages are from Ekiga:

ALSA lib confmisc.c:1286:(snd_func_refer) Unable to find definition 'defaults.namehint.extended'
ALSA lib conf.c:3513:(_snd_config_evaluate) function snd_func_refer returned error: No such file or directory
ALSA lib conf.c:3985:(snd_config_expand) Evaluate error: No such file or directory
ALSA lib pcm.c:2144:(snd_pcm_open_noupdate) Unknown PCM plughw:0

I finally looked into this and was able to fix it with the simple command

 $ sudo asoundconf reset-default-card

Dual Headed X11 setup with GeForece 8400 GS on Debian lenny/sid

Having a job at the university means that I have access to hardware that I can’t afford to buy for myself.  My coworker was getting a new video card for his workstation and they just ordered me one too.  The card is an Nvidia GeForce 8400 GS PCI Express card manufactured by Chaintech.

Downloading the Driver

I have zero experience with post AGP video cards or dual head setups, so I just went off of my corworkers recommendation that I use the non-free Nvidia driver.  I downloaded it from this page:

http://www.nvidia.com/object/linux_display_ia32_169.12.html

Installing the Driver

I ran the driver installer with the command:

sh NVIDIA-Linux-x86-169.12-pkg1.run

and it told me that it needed to be run as root and after X was shut down, so I had to switch to a console, kill X and su to root.

The installer told me that it couldn’t find any precompiled drivers for my kernel, so I would have to build them.

The installer also told me that the compiler that it found (gcc-4.2) was different than the one used to build my running kernel (gcc-4.1), so I had to set my CC environment variable to /usr/bin/gcc-4.1:

export CC=/usr/bin/gcc-4.1

It then told me that it couldn’t find the kernel source or kernel headers for my kernel (at the time 2.6.24-1).  To get the headers, I followed some of the directions for building out-of-tree kernel modules:

apt-get install linux-headers-2.6.24-2-686

Finally, I reran the driver installer, specifying the location of my kernel headers:

sh NVIDIA-Linux-x86-169.12-pkg1.run –kernel-source-path=/usr/src/linux-headers-2.6.24-1-686/

and the installation completed without a hitch.

Configuring X (for this card with dual heads)

This was the easy part because my coworker kicked me this config file:

# xorg.conf (X.Org X Window System server configuration file)
#
# This file was generated by failsafeDexconf, using
# values from the debconf database and some overrides to use vesa mode.
#
# You should use dexconf or another such tool for creating a "real" xorg.conf
# For example:
#   sudo dpkg-reconfigure -phigh xserver-xorg

Section "ServerFlags"
    Option "DefaultServerLayout" "layout0"
#    Option "Xinerama" "True"
EndSection

Section "InputDevice"
	Identifier	"keyboard0"
	Driver		"kbd"
	Option		"XkbRules"	"xorg"
	Option		"XkbModel"	"pc105"
	Option		"XkbLayout"	"us"
EndSection

Section "InputDevice"
	Identifier	"mouse0"
	Driver		"mouse"
EndSection

Section "Device"
	Identifier	"nvidia0"
	Boardname	"GeForce 8400 GS"
	Busid		"PCI:1:0:0"
	Driver		"nvidia"
	Screen	0
#    Option "Monitor-" "monitor0"
#    Option		"NoLogo"	"True"
EndSection

Section "Monitor"
	Identifier	"monitor0"
	Vendorname	"Plug 'n' Play"
	Modelname	"Plug 'n' Play"
EndSection

Section "Screen"
	Identifier	"screen0"
	Device		"nvidia0"
	Monitor		"monitor0"
	Defaultdepth	24
	SubSection "Display"
		Depth	24
	EndSubSection
EndSection

Section "Device"
	Identifier	"nvidia1"
	Boardname	"GeForce 8400 GS"
	Busid		"PCI:1:0:0"
	Driver		"nvidia"
	Screen	1
#    Option "Monitor-" "monitor0"
EndSection

Section "Monitor"
	Identifier	"monitor1"
	Vendorname	"Plug 'n' Play"
	Modelname	"Plug 'n' Play"
EndSection

Section "Screen"
	Identifier	"screen1"
	Device		"nvidia1"
	Monitor		"monitor1"
	Defaultdepth	24
	SubSection "Display"
		Depth	24
	EndSubSection
EndSection

Section "ServerLayout"
	Identifier	"layout0"
    Screen 0 "screen0" 0 0
    Screen 1 "screen1" RightOf "screen0"
    Option "CoreKeyboard" "keyboard0"
    Option "CorePointer" "mouse0"
EndSection

Section "Module"
	Load		"glx"
	Load		"v4l"
EndSection

Section "DRI"
    Mode 0667
EndSection